
First, let me be clear that I am NOT an expert on henna. Though I have spent a lot of time reading, researching, and watching tutorial videos about henna, I cannot claim to know everything there is to know about it. This is just my experience and results with using henna on my hair.
Henna is something I have always had an interest in - but I had some reservations about it. I would research it on and off every so often, then something would make me hesitate: it takes a lot of preparation time, what if the henna I get isn't pure, it's super permanent so what if I hate it? Then I would think, "yeah, maybe I shouldn't. I'll just stick to my regular drugstore dyes."
In the last few months, my interest in henna began to grow. I started spending more time researching and reading all I could find about it. I was starting to really feel like hey, maybe this would actually work for me. It's all natural, there's no crazy questionable chemicals in there, I don't have to make an appointment at a salon, it's supposed to be good for my hair and not damage it, and it's permanent.
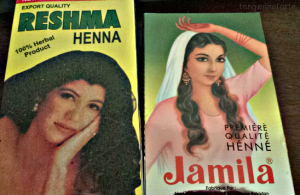
After reading and watching enough videos, I finally felt like I was ready to take the plunge and try it out. So far I have henna'd my hair three times, for the first two times I used Reshma henna, and then I used Jamila henna. Both worked very nicely for me, and I didn't see a huge difference between them. I got good dye release and staining power from both of them.
Now, I am the type of person that does not measure anything when it comes to recipes. I cannot tell you for sure how much I put in there, or how much YOU should put in your henna. I just eyeballed the measurements until I felt that the consistency was right.
This is my method. Keep reading, it's a lot to go through...

You will need:
- Henna of your choice. Make sure it is 100% pure henna! Do not use henna that says "blonde henna" or "brown henna", or anything like that. Henna only stains one color: coppery, reddish, gingery color. You CAN add other natural things to henna such as indigo or cassia, but I personally have no experience with those. 100g of henna would work for medium length, slightly shoulder length hair. 200g of henna would work for longer hair, or to make a bigger batch in which the leftovers can be frozen and thawed for later use.
- A plastic or glass bowl. A plastic spoon for stirring.
- Plastic wrap.
- An acidic liquid: lemon or lime juice work fine.
- Tea, or water
- Vaseline or other protective barrier cream to prevent skin stains
- Cheap conditioner. You want a conditioner that is rather thin and easy to wash out - make sure it's a cheap one because I easily use half a bottle during my rinsing process. You don't want to use your nice Redken or Matrix conditioners for this! I recommend V05 conditioner or White Rain.
- Lots of time to plan out your henna process. It's a whole day affair.
Okay, so this is what I did.
1. First, I used a plastic bowl and plastic spoon. I went to the Dollar Tree to get a bowl specifically for this. Do NOT use anything metal in your preparations: stick to glass, or plastic.
2. I dumped the whole box of henna in the bowl. It was quite a lot, about 200g (I couldn't find the actual amount anywhere on the box).
3. I juiced a fresh lime and used all of the lime juice in the henna.
 4.
I made some strong herbal tea: I used Honey Chamomile tea. Then, I
slowly added the tea and stirred until the texture of the henna felt
like mashed potatoes.
4.
I made some strong herbal tea: I used Honey Chamomile tea. Then, I
slowly added the tea and stirred until the texture of the henna felt
like mashed potatoes.5. I covered the henna tightly with plastic saran wrap. Then, I placed a dish towel over the bowl and left it over night. I went to bed.
6. In the morning, I checked the henna and the top layer of the henna had darkened from an olive green to a muddy, brownish green. This is a good sign that the dye in the henna has released and is ready to use. I put a little dot of henna on my hand, waited about a minute, then wiped it off. A slightly orange dot was left behind on my hand... perfect! Ready to use.
7. Before I applied the henna, though, I added a bit of coconut milk to the mixture to help make it a bit creamier and easier to apply. The coconut milk will also help with conditioning the hair. The third time I henna'd, I did not add coconut milk. All I used was henna, lemon juice, and a bit of tea. It still worked just as well. When the texture felt a bit like pudding or yogurt, then I felt like it was good enough to work with.
8. Then, I applied Vaseline all over my forehead, ears, and neck, to prevent staining. I sectioned my hair off into 4 sections with clips. Then I began to apply the henna to my hair. It's a lot different than using traditional dyes because it doesn't slip and spread as easily as regular dye does: it feels like wet mud and takes a bit more time to ensure each hair is covered.
9. After I applied the henna to my whole head (and looked like a swamp monster had pooped on my head), I wrapped my hair with saran wrap. Then, I put a shower cap on top.
10. Let the henna stay on hair for about 4-6 hours. Yes. It's a long process.
11. Rinse hair in the shower until it feels like some of the mud has loosened up and came out. Then, use a lot of conditioner in your hair, from root to tip, and scrub as if you were shampooing your hair. Then rinse. Repeat until the water generally runs clear. It takes me about 3-4 times of washing with conditioner until it rinses completely out.
... And that's basically it. Yes, it's a super involved process. This is definitely a time commitment and it isn't for everyone. But, I am really happy with the results on my dark brown hair - it adds a nice subtle reddish, coppery glow to my hair. It also covers my grays, leaving them gorgeous and coppery like highlights. In the sunlight, my hair has a gorgeous coppery glow that I just love!
On my dark hair, the result is subtle. If you have lighter hair, your result will be a lot more noticeable. If you are blonde, for example, your hair may turn out a more fiery copper.
I definitely think I am a henna user for life now! I love it. My hair feels so soft, it looks so shiny. It feels so much healthier than when I was using commercial dyes. No breakage, no scalp irritation.
Here are some pictures of the results.

- After I used henna for the first time.

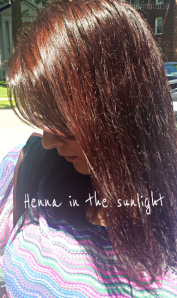
- The way my henna'd hair looks in the sunlight. My hair looks a bit frizzy because it was air-dried here.


- I'm happy with it!

No comments:
Post a Comment
Thank you for taking the time to comment. Please keep things respectful! :-)